How to Fix a Leaky Faucet (Step-by-Step for Every Type)
Here is how to fix a leaky faucet. Turn off the water under the sink, find your faucet type, and replace the worn part: the rubber washer in a compression faucet, the cartridge in a cartridge faucet, the seats and springs in a ball faucet, or the seals in a ceramic disc faucet. Most dripping faucets come down to one worn seal. The EPA says a faucet dripping once per second can waste more than 3,000 gallons a year.
This guide covers dripping kitchen and bathroom sink faucets. You don’t need plumbing experience, just basic hand tools and the right replacement part.
Key takeaways
- Where the water shows up (spout, spout base, handle or under the sink) tells you which part to check.
- How the handle moves is the fastest way to tell the four faucet types apart.
- On a two-handle faucet, close one shutoff valve at a time to learn which side is dripping, so you only buy one part.
- Take the old part to the store, or look up your brand and model number first.
Why is my faucet dripping?
A faucet drips when a seal inside it stops closing tightly. Every time you turn the handle, rubber washers, O-rings and seals rub against metal or ceramic parts. Over the years they harden, crack or wear thin. Minerals in hard water can also build up and keep parts from sealing.
The EPA notes that old and worn faucet washers and gaskets frequently cause faucet leaks. In single-handle faucets, Moen says a drip from the spout after the handle is off is usually caused by the cartridge.
A few drops right after you shut the faucet off are usually just water draining out of the spout. If drips keep coming after that, the faucet has a leak.
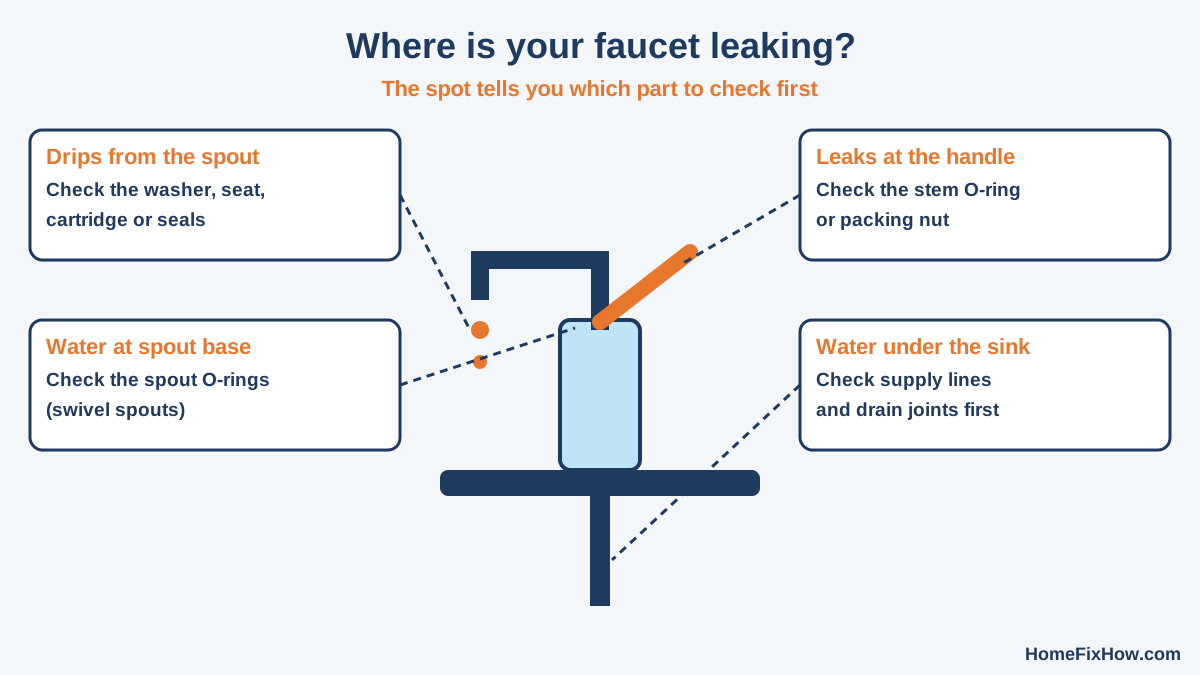
Where is your faucet leaking?
| Where you see water | Part to check first | Where to look in this guide |
|---|---|---|
| Drips from the spout tip | Washer and seat (compression), cartridge, ball seats and springs, or disc seals | The fix for your faucet type |
| Water around the base of the spout | Spout O-rings (on swivel spouts) | Ball faucet or cartridge faucet |
| Water around the handle | Stem O-ring, packing nut or ball adjusting ring | The fix for your faucet type |
| Puddle under the sink | Supply line nuts and drain joints, not the faucet itself | When to call a plumber |
Two-handle faucet? Find the leaking side first. Close the hot shutoff valve under the sink and watch the spout for a few minutes. If the drip stops, the hot side is leaking. If it keeps going, open the hot valve, close the cold one and watch again. Now you only need to take apart one handle.
How to identify your faucet type
Sink faucets come in four main types: compression, cartridge, ball and ceramic disc. You can usually tell them apart by how the handle moves. Each type uses different parts, so knowing yours before you start saves a second trip to the store.
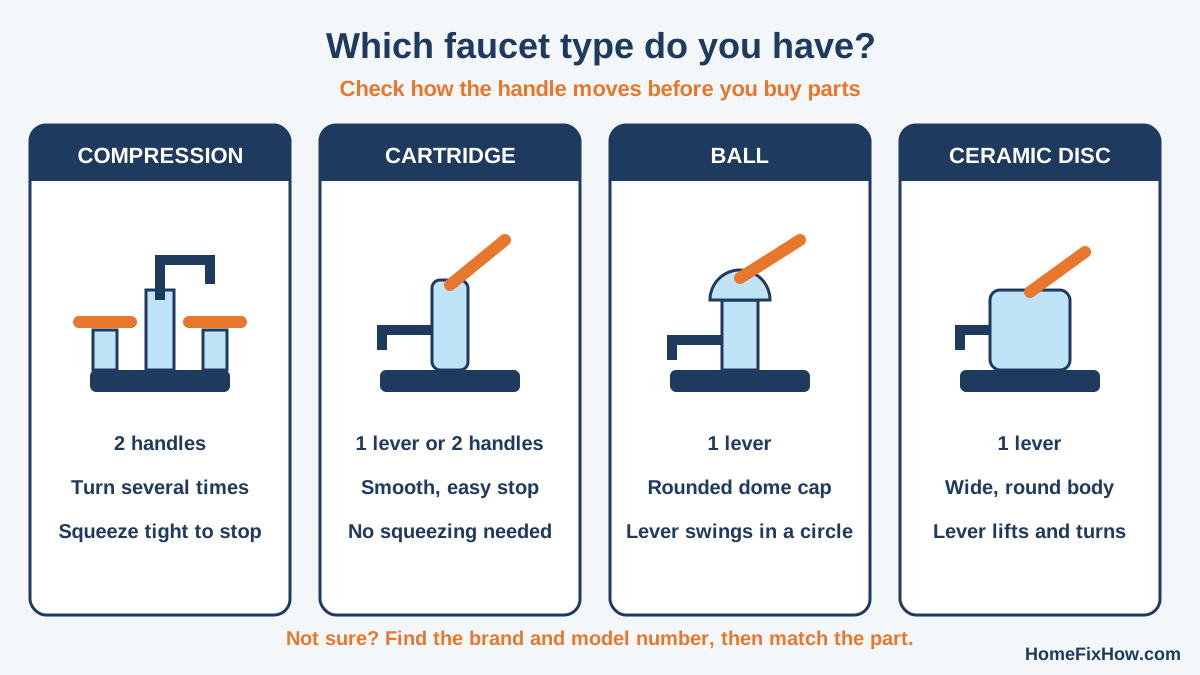
- Compression: two handles that turn several times and need a firm squeeze to stop the water. Common in older homes.
- Cartridge: one lever, or two handles that stop smoothly without squeezing.
- Ball: one lever sitting on a rounded, dome-shaped cap. Most often found on kitchen sinks.
- Ceramic disc: one lever on a wide, round body.
Cartridge and ceramic disc faucets can look alike from the outside. Look for a brand name on the faucet or handle, then check that brand’s parts page with your model number. Moen, for example, suggests finding the right cartridge with your model number or its parts sheet before you buy.
Tools and parts you’ll need
| Item | Used for |
|---|---|
| Flathead and Phillips screwdrivers | Prying off handle caps, removing handle screws |
| Hex (Allen) keys | Set screws on many single-lever handles |
| Adjustable wrench | Packing nuts, retaining nuts, cap nuts |
| Needle-nose pliers | Pulling retaining clips and old seals |
| Replacement part for your faucet type | Washer and O-ring kit, cartridge, ball repair kit or disc seals |
| Silicone plumber’s grease | Coating new O-rings so they seal and slide in easily |
| White vinegar and an old toothbrush | Cleaning mineral buildup off parts |
| Towel, drain plug or rag | Padding the sink and keeping small parts out of the drain |
| Seat wrench (compression faucets only) | Removing a worn valve seat |
How to fix a leaky faucet safely: shut off the water first
- Turn both shutoff valves under the sink clockwise until they stop.
- Open the faucet to drain the water left in the lines and to confirm the water is off.
- Close the drain stopper or stuff a rag in the drain so screws can’t fall in.
- Lay a towel in the sink to protect the finish.
- Take a phone photo at each step, and line parts up on the counter in the order they came off.
If a shutoff valve won’t turn, don’t force it with a wrench. Old valves can snap or start leaking at the stem. Shut off the water at the main valve for the house instead, and plan to have that sink valve replaced.
How to fix a leaky compression faucet
A dripping compression faucet almost always needs a new seat washer, the small rubber disc at the bottom of the stem. If it drips around the handle instead, replace the O-ring on the stem or tighten the packing nut.
- Pry off the decorative cap on the leaking handle and remove the screw under it.
- Pull the handle straight up. If it’s stuck, wiggle it gently rather than prying against the sink.
- Unscrew the packing nut with an adjustable wrench, then turn the stem out the same way you would open the faucet.
- Remove the brass screw at the bottom of the stem and pop off the old seat washer.
- Fit a new washer of the same size and shape, flat or beveled, and a new brass screw if the old one is worn.
- Replace the O-ring on the stem and coat it lightly with plumber’s grease.
- Screw the stem back in, tighten the packing nut snugly, and refit the handle.
Look into the faucet body with a flashlight before you put the stem back. If the brass valve seat the washer presses against is pitted or rough, a new washer will wear out fast. Unscrew the seat with a seat wrench and take it to the store to match it.
How to fix a leaky cartridge faucet
Replacing the cartridge fixes most dripping cartridge faucets. A single-handle faucet has one cartridge, and a two-handle faucet has one in each handle.
- Pop off the handle cap and remove the handle screw or set screw.
- Lift off the handle and any trim pieces.
- Remove the retaining clip with needle-nose pliers, or unscrew the retaining nut.
- Before pulling the cartridge, note which way its stem or tab points. A cartridge put back facing the wrong way can swap hot and cold.
- Pull the cartridge straight up. Some brands include a plastic puller tool with the new cartridge for stuck ones.
- Push the new cartridge in the same way the old one faced, then refit the clip or nut, the trim and the handle.
Check whether your faucet is still under warranty before you buy a cartridge. Moen suggests looking up its faucet and parts warranties first.
If water leaks at the base of a swivel spout, twist the spout up and off after the cartridge is out, and replace the O-rings around the faucet body.
How to fix a leaky ball faucet
A ball faucet drips when the two small rubber seats and springs under the ball wear out. Buy a ball faucet repair kit that matches your brand. Kits usually include new seats, springs and the cam seal.
- Loosen the set screw and lift off the handle.
- Unscrew the dome-shaped cap. Wrap it in tape or a cloth first so the wrench doesn’t scratch it.
- Lift out the cam, the cam washer and the ball.
- Use a small screwdriver to lift out the old rubber seats and springs from the holes inside the body.
- Push the new springs into the seats, then press them into place with your finger.
- Set the ball back in, lining up its slot with the small pin in the body, then refit the cam, washer and cap.
If water seeps out around the handle, tighten the adjusting ring just under the cap with the small tool that comes in most repair kits.
How to fix a leaky ceramic disc faucet
Ceramic discs rarely wear out, so a leak usually comes from the rubber seals under the disc cylinder, or from grit stuck between the discs.
- Remove the handle set screw and lift off the handle and the cap under it.
- Unscrew the mounting screws holding the disc cylinder and lift it out.
- Pull the rubber seals off the bottom of the cylinder.
- Soak the cylinder in white vinegar to loosen mineral buildup, then brush it clean.
- Fit new seals, put the cylinder back and refit the handle.
- With the lever in the open position, turn the water back on slowly so the rush of water doesn’t crack the discs.
If you see a chip or crack in a disc, replace the whole cylinder.
Turn the water back on and test
Open the faucet partway, then open the shutoff valves slowly. Let the water run for about a minute to push out air. It may sputter at first. Shut the faucet off and watch the spout and handle for several minutes.
If the flow is weak after the repair, unscrew the aerator at the tip of the spout and rinse out any grit that came loose.
Still dripping after the repair?
- Wrong part: a cartridge or washer that is almost the right size won’t seal. Compare the old and new parts side by side.
- Worn seat (compression): a new washer on a pitted seat keeps dripping. Replace the seat.
- Wrong side: on two-handle faucets, both sides may be worn. Repeat the shutoff test.
- Grit in the parts: debris from the pipes can land on a new seal. Take it apart, rinse it and reassemble.
- Cracked faucet body: if water seeps from the metal itself, the faucet needs replacing.
How much water does a dripping faucet waste?
More than most people expect. The U.S. Geological Survey counts about 15,140 drips in one gallon. According to the EPA’s WaterSense program (2026), a faucet dripping once per second can waste more than 3,000 gallons a year, about the water needed for 180 showers.
The EPA also says fixing easy household leaks can save about 10% on water bills. If you’re tracking down leaks, check your toilets too. Our guide on how to fix a running toilet shows a simple dye test for silent tank leaks.
When to call a plumber
Call a licensed plumber if the shutoff valves under the sink won’t close or leak, the faucet body is cracked or badly corroded, the supply connections are soldered copper, or water is damaging the cabinet or floor. A puddle under the sink often comes from a supply line or drain joint rather than the faucet, so have it checked if tightening a connection by hand doesn’t stop it.
FAQ
Can I just tighten the handle to stop the drip?
Only for a short time, and only on compression faucets. Cranking the handle squeezes a worn washer harder, which wears it out faster and can damage the seat. On cartridge, ball and disc faucets, extra force does nothing and can break plastic parts.
Why does my faucet drip only when hot water is on?
On a two-handle faucet, the parts in the hot side tend to wear first because heat ages rubber faster. Use the shutoff test to confirm, then replace only the hot-side washer or cartridge.
Should I repair or replace a leaky faucet?
Repair it if the body is in good shape and you can find the part. Replacing the whole faucet makes more sense if the body is cracked or corroded, parts are no longer made, or you’ve already fixed it more than once and it still leaks.
Can I fix a leaky faucet without turning off the water?
No. Once you remove the cartridge, stem or ball, water under full pressure sprays out of the faucet body. Always close the shutoff valves first. If your sink has no shutoff valves, turn off the main water valve for the house.
Bottom line
Knowing how to fix a leaky faucet mostly comes down to two checks: where the water is coming from and which faucet type you have. Match the part, swap it with the water off, and test before you put your tools away. If the shutoff valves or faucet body are the problem, that’s the time to call a plumber.